Klicky Probe NG (Next Generation)
Microswitch probe with magnetic attachment, primarily aimed at CoreXY 3d printers, with enclosed magnets, don’t fall, don’t need to be glued.
This version is still a BETA version, so please use with care. Its parent version, and still the recommended one is Klicky.
The objectives for this project are:
- drop in replacement for Omron TL-Q5MC2 or PL-08N2 (you don’t need to replace the toolhead), replacement of BLtouch probes
- no soldering required
- minimal adjustments required
- be able to detect all the print surfaces
- be as close to the hotend tip as possible
- highly repeatable and accurate probes
- less temperature variations
- no melting of its parts
- reuse spare parts if possible
- no need to use hard to source parts
- no need to glue the magnets
For now this document will only deal with KlickyNG-specific wiring; for all the rest of the configuration, please follow the main guide.
The inspiration for the Klicky Probe comes from the Quickdraw and the Euclid probe, it uses some concepts from each of the projects, but with this version, it expands on the concept, as the method that it uses was developed independently.
Please check the main Klicky repository for all the people that helped this project, for NG, would like to thank (in no specific order) Dustinspeed, Drachenkatze, clee, maz and whoppingpochard.
If you want to donate something regarding this project, use this link or Buy me some ABS!, thanks
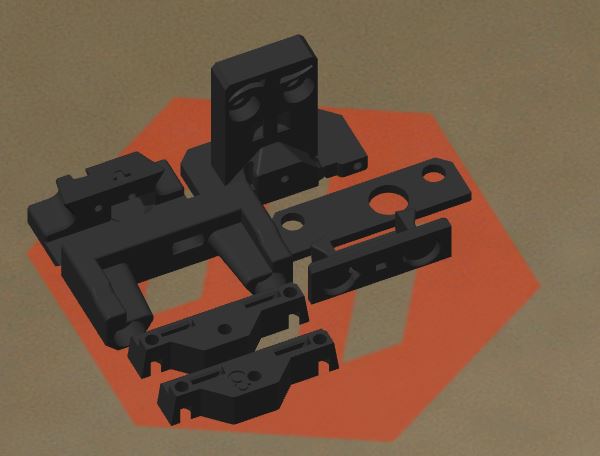
Without further delay, here is the new version with enclosed magnets:

The eyebrows are clee+whoppingpochard’s design.
KlickyNG support
For now, only printers compatible with Voron StealthBurner/AfterBurner are compatible, as the NG mount has changed significantly and needs to be ported to the other mounts.
The arms are compatible with both Klicky and KlickyNG.
There is also an exploded view.
Print Settings
There is no need for supports; recommended settings are 4 perimeters/top/bottom, at least 23% infill. The STL’s are already oriented for you, so you only need to send them to the slicer.
Required parts
  |
If you want to reuse your old Klicky dock, it needs to use this setup for the back magnet. It will also be necessary to print the 2mm NG extender, as the dock needs to be 2mm longer. |
|---|---|
 |
Probe Insert, required to hold the switch and the two magnets that make the electrical connection |
 |
Probe body, required to prevent the two front magnets from escaping the probe, holds the third magnet to help attach the probe to the mount and the back magnet to secure it to the dock |
 |
Mount back, mounts to the AB/SB, holds the third magnet and the wire connections |
  |
Mount front, 2 versions; one for around 2.75mm (instead of 3mm) height, and one for actual 3mm-height magnets |
Bill of Materials (BOM)
- 1x microswitch (the Omron D2F-5, or D2F-5L with the lever removed, are recommended, but similar-sized microswitches like D2F-1 and KW10 will also work)
- 30cm of wire, AWG22 or similar
- 5 M2x10mm self-tapping screws
- 8x 6mm diameter x 3mm height magnets
- 2x M3x18mm/M3x20mm screws
Build Process
First, assemble the required materials.

Probe assembly
- Put two magnets on the KlickyNGProbe_v3 Insert, and make sure they have the same polarity.

- Next, insert another magnet on the back groove of the KlickyNGProbe_v3 Body. In this image, all 3 magnets should have the same polarity on top, so that when they are assembled, the back magnet will repulse the two front magnets.

- Now, place the insert on the body, aligning the magnets and making sure that the front magnets do not move out of place.

- Insert the microswitch in its place (pictured here a KW10)

- Secure the microswitch with the two M2x10 screws to secure the switch, and also pull the two parts of the probe body together.

- Insert the back magnet, and the probe is complete!
|
 |
|  |
| ———————————————————— | ———————————————————— |
|
| ———————————————————— | ———————————————————— |
AB/SB mount assembly
- Cut the 30cm of wire in half to create two 15cm lengths of wire. Remove 7-8mm of insulation, and rotate the core to prevent loose wires.

- Insert the wire on the holes on the back mount

- Rotate the wires around the other end to prevent them from escaping when the mount is being assembled

- Put two magnets on top on the probe front magnets

- Insert the correct front mount on the magnets so that they remain attracted to the probe.

- with the magnets and front secure, joint the mount front and back with an m2 screw

- Now, complete with the remaining two m2 screws that will keep the front level

- Attach another magnet on the 3rd probe magnet

- Respecting its polarity, put it into the mount back magnet socket

- The mount is now assembled!
|
 |
|  |
| ———————————————————— | ———————————————————— |
|
| ———————————————————— | ———————————————————— |
Final thoughts
For the installation, you should now replace the dock (or add the extender to your existing dock) and mount the probe mount to AB or SB and test it. You shouldn’t need to change any configuration on your printer, if Klicky was already running without problems.
I have tested Aliexpress N35, N42 and N45 (graciously provided by Drachenkatze) with over 2000 attach/probe/dock without a single probe or dock operation failure.
Please test and report, but remember, this is a BETA! It may twist your extrusions, or ruin your print surface. Use with care.
There will also be soon a Unklicky for KlickyNG, stay tuned.
It is working very well for me. If you decide to use it, please send me feedback, either here, or on Voron discord. My discord username is @JosAr#0517.
By standing on the shoulders of giants, let’s see if we can see further.